
FFXIV Hunt Relay Macro Guide
Final Fantasy XIV: The Hunt
Relay Macro Guide
About This Guide
If you stumbled upon this guide, you likely know what The Hunt in Final Fantasy XIV is. If not, please check out The Modern Guide to FFXIV Hunts that covers the basics of this in-game system. It mentions that one way to receive relays for S-Ranks, Hunt Trains, and Boss FATEs is to join a hunt relay Linkshell. These linkshells can't function without relayers. This guide can help you get started in relaying.

The User Macro Window
✦ What are macros?
"User Macros" is an in-game feature in FFXIV that allows you to create a sequence of chat commands that you can initiate with a single click.To open the User Macros window, go to System > User Macros in your menu.You can drag and drop your marcos over to your hotbars.
✦ Why set up relay macros?
Setting up macros makes it easy to spread the word about a Hunt or Special FATE through in-game means. By spreading the word about an active Hunt/Special FATE, more people can help take down the enemy and receive rewards.While websites, discord servers, and plugins exist, not all players have access to them. If someone is already in-game, they can view relays in their chat window.
✦ What are Linkshells?
A Linkshell is a chat channel within your chat window. There are two types of Linkshells in FFXIV: a "local" linkshell (limited to characters within one server/world, abbreviated to "LS") and a Cross-world linkshell (CWLS).A Local Linkshell requires speaking to an NPC in one of the three starting cities to create. A Cross-world Linkshell can be created via the Cross-world Linkshells window.
✦ How do I join a Linkshell?
You may ask for invites in shout chat at Hunts, or find Hunt-related Discord servers which have specific channels for requesting invites to Hunt Linkshells.You may find a list of Discord servers by Data Center on the Faloop Community Page.
Macro Basics
Building blocks for creating your hunt relay macros.
✦ Send Message to Local Linkshell
/l1
The number after the letter "l" corresponds to the linkshell number according to your linkshell list. The text you want to send to these linkshells go after this command.
✦ Send Message to Cross-world Linkshell
/cwl1
Similarly to the local linkshell command, the number after "cwl" corresponds to the cross-world linkshell number according to your cross-world linkshell list.
✦ Link a Flag
<flag>
Displays the map coordinates of where your flag is set. These coordinates will place a flag and open the map when you click on them.
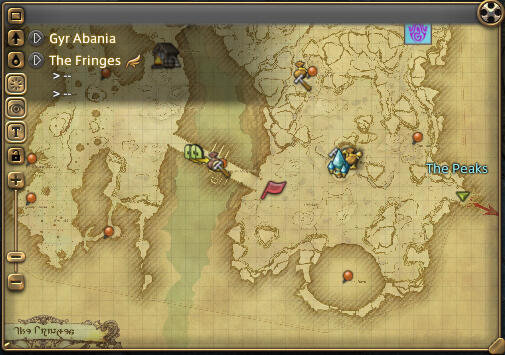
How the flag appears on your map

How the flag appears in your chat
✦ Link Your Current Position
<pos>
Displays the map coordinates of where your character is currently located. Similarly to <flag>, these coordinates will place a flag and open the map when you click on them.
✦ Display Target Name
<t>
Displays the name of whatever thing you are targeting.
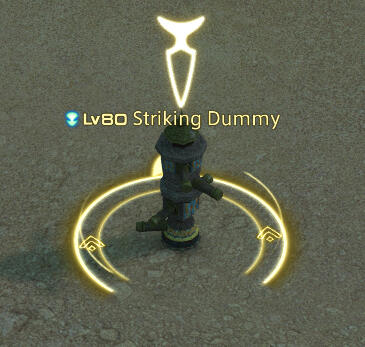
What it looks like when you're targeting something

How the target name appears in your chat
✦ Display Target HP as a Percentage
<thpp>
Displays the percentage of HP of whatever thing you are targeting.

How target HP percentage appears in your chat
✦ Special Characters
These are completely optional, but if you want your messages in chat to stand out, you may use these special unicode characters. A list of available ones can be found on this lodestone post. You can copy from that lodestone post and paste them in your game. If you are on console, you will have to copy symbols from other players' messages.
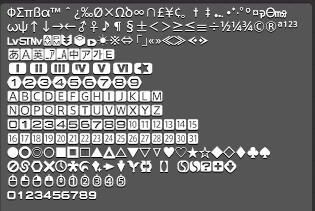
What the special characters look like in-game
Sample Macros
Ready for you to copy and paste and edit with your own linkshell numbers and special characters.
✦ S-Rank Relay to Local Linkshells
/l1 S-Rank → <flag>
/l2 S-Rank → <flag>
/l3 S-Rank → <flag>
/l4 S-Rank → <flag>
For relaying S-Ranks on your world to local linkshells.
✦ S-Rank Relay to Crossworld Linkshells
/cwl1 FAERIE S-Rank → <flag>
/cwl2 FAERIE S-Rank → <flag>
Replace FAERIE with the world that the S-Rank is on. You may chose to relay only your home world's S-Ranks, or you can make macros for every world on your Data Center.
✦ A-Rank Relay
For when you are right next to an A-Rank and have it targeted:
/l1 A-Rank → <t><pos>
/l2 A-Rank → <t><pos>
/l3 A-Rank → <t><pos>
/l4 A-Rank → <t><pos>
For when you have the flag selected (you're relinking from another relay):
/l1 A-Rank → <flag>
/l2 A-Rank → <flag>
/l3 A-Rank → <flag>
/l4 A-Rank → <flag>
✦ Hunt Train Relay
/l1 Hunt Train starting at → <flag>
/l2 Hunt Train starting at → <flag>
/l3 Hunt Train starting at → <flag>
/l4 Hunt Train starting at → <flag>
✦ Boss FATE Relay
/l1 Boss FATE at → <flag>
/l2 Boss FATE at → <flag>
/l3 Boss FATE at → <flag>
/l4 Boss FATE at → <flag>
You may wish to be more specific about which Boss Fate if you are relaying. The current Boss Fates as of Dawntrail are:
Behemoth (Coerthas Central Highlands)
Odin (The Black Shroud zones)
Coeurlregina (The Dravanian Forelands)
Noctilucale (Azys Lla)
Ixion (The Lochs)
Tamamo Gozen (Yanxia)
Archaeotania (The Tempest)
Formidable (Kholusia)
Chi (Ultima Thule)
Daivadipa (Thavnair)
Ttokrrone (Shaaloani)
Mica the Magical Mu (Dawntrail Zone 6)
✦ Achievement FATE Relay
/l1 Achievement FATE at → <flag>
/l2 Achievement FATE at → <flag>
/l3 Achievement FATE at → <flag>
/l4 Achievement FATE at → <flag>
Certain FATEs award 10 achievement points upon completion. They can be found under the Battle category in the Achievements menu.
✦ Instances
/l1 Instance 1
/l2 Instance 1
/l3 Instance 1
/l4 Instance 1
/cwl1 Instance 1
/cwl2 Instance 1
You may create a macro for each instance (1, 2, 3). This usually follows a relay with a flag of an instanced area.If you are in the zone and instance where the S-Rank/A-Rank/Train/FATE is, the instance will automatically be part of the <flag>, so using this macro wouldn't be necessary.
✦ Oops Macro
/l1 Please disregard my last relay.
/l2 Please disregard my last relay.
/l3 Please disregard my last relay.
/l4 Please disregard my last relay.
/cwl1 Please disregard my last relay.
/cwl2 Please disregard my last relay.
There may be times where you send a bad flag or accidentally click on your macro. Have an Oops macro ready to correct yourself before anyone wastes their time following your relay.
Tips
Use symbols from the special characters list to make your macro stand out. You can use an "x" icon for your Oops macro, or a special symbol with the letter "S" for S Ranks and "1" for Instance 1. Try to not overdo the symbols as they can be harder to read than plain text. Symbols are sometimes also filtered out by mute lists or "adblock" plugins.
Make a macro to hold special characters so you don't need to keep looking them up.
Either add your macros directly to a hotbar, or add the link to the User Macros menu to your hotbar. You can also make collapsable hotbars as explained in this article.
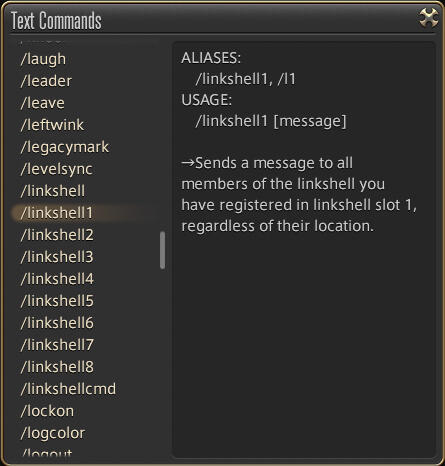
Click on the "Text Commands" button in the User Macros window to view a list of available commands as well as their aliases (shorthand).
Assign icons and names to your macros so you can tell them apart easily.
✦ Macro Icons
While there are default icons you can assign to macros by clicking on the icon next to the "Name" field, you can also make a macro icon an icon of a minion, emote, or action. The following line can be placed at the beginning of your macro:
/micon "icon name" [category]
The "icon name" in quotes is the exact name of the action or item with the icon you want. The "category" is the type of icon the image belongs to. For example, if you wanted to make your macro icon the Great Serpent of Ronka minion, you would use the following:
/micon "The Great Serpent of Ronka" minion

The different categories include:
action - Any skill from the "Actions" tab in the "Character > Actions & Traits" window
blueaction - Any blue mage ability from the "Character > Blue Magic Spellbook" window
pvpaction - Any PVP ability
general - Any ability from the "General" tab in the "Actions & Traits" window
emote - Any emote from the "Emotes" window
companion - Any emote from the "Orders > Companion" tab in the "Character > Actions & Traits" window
pet - Any emote from the "Orders > Pet" tab in the "Character > Actions & Traits" window
minion - Any minion from the "Character > Minion Guide" window
mount - Any minion from the "Character > Mount Guide" window
enemysign - Any sign from the "Party > Signs" window
waymark - Any waymark from the "Party > Waymarks" window
classjob - Class (i.e. Conjurer) and Job (i.e. White Mage) names
quickchat - Any icon from the "Quick Chat" tab in the "Character > PvP Profile" window
item - Any item in your inventory